When it comes to desserts that are both comforting and easy to make, few can rival the humble yet delightful apple-pear crisp. This classic dessert combines the natural sweetness of seasonal fruits with a crunchy, buttery topping, creating a dish that is as satisfying to make as it is to eat. Whether you’re a seasoned baker or a novice in the kitchen, this article will guide you through everything you need to know about making the perfect apple-pear crisp, from selecting the best ingredients to customizing the recipe to suit your taste. By the end of this article, you’ll be equipped with all the knowledge you need to create a dessert that will impress your family and friends.
What Makes Apple-Pear Crisp a Perfect Dessert Choice?

Comfort Food at Its Best
Apple-pear crisp is the epitome of comfort food. The warm, gooey fruit filling paired with the crispy, crumbly topping is a combination that appeals to almost everyone. It’s the kind of dessert that brings back memories of family gatherings, holiday feasts, and cozy evenings by the fire. The simplicity of the dish allows the natural flavors of the fruits to shine, making it a timeless favorite.
Seasonal Fruit Dessert
One of the best things about apple-pear crisp is that it can be made with seasonal fruits. Apples and pears are at their peak during the fall and winter months, making this dessert a perfect choice for autumn gatherings and holiday dinners. Using seasonal fruits not only ensures that your crisp will be bursting with flavor, but it also supports local farmers and reduces your carbon footprint.
Easy Fruit Crisp Recipes
Another reason why apple-pear crisp is a perfect dessert choice is its simplicity. Unlike pies or tarts that require precise measurements and techniques, a crisp is forgiving and easy to make. With just a few basic ingredients and minimal prep time, you can have a delicious dessert ready to serve. It’s a great option for busy weeknights or last-minute dinner parties.
Health Benefits
While apple-pear crisp is undoubtedly a treat, it also offers some health benefits. Apples and pears are rich in fiber, vitamins, and antioxidants, making them a nutritious addition to your diet. The oatmeal topping adds a dose of whole grains, and if you opt for nuts, you’ll get a boost of healthy fats and protein. By making a few smart ingredient choices, you can enjoy this dessert guilt-free.
Key Ingredients for Your Apple-Pear Crisp: Freshness Matters!
Best Apples for Baking
The type of apple you choose can make a big difference in the final outcome of your crisp. For baking, you want apples that hold their shape and don’t turn to mush. Some of the best varieties for baking include:
- Granny Smith: These tart apples are a classic choice for baking. Their firm texture and tangy flavor balance out the sweetness of the dessert.
- Honeycrisp: Known for their sweetness and crispness, Honeycrisp apples add a delightful flavor and texture to the crisp.
- Braeburn: These apples have a perfect balance of sweet and tart, making them a versatile choice for baking.
- Fuji: Fuji apples are sweet and firm, making them a great option for those who prefer a sweeter dessert.
Ripe Pears for Crisp
When selecting pears for your crisp, look for ones that are ripe but still firm. Overripe pears can become too mushy when baked, while underripe pears may not have developed their full sweetness. Some of the best pear varieties for baking include:
- Bartlett: These pears are sweet and juicy, making them a popular choice for desserts.
- Anjou: Anjou pears have a slightly firmer texture and a mild, sweet flavor that works well in crisps.
- Bosc: Bosc pears are known for their dense, firm texture and sweet-spicy flavor, making them an excellent choice for baking.
Oatmeal Topping Ingredients
The topping is what sets a crisp apart from other fruit desserts. A good crisp topping should be crunchy, buttery, and slightly sweet. Here are the key ingredients you’ll need:
- Rolled Oats: Rolled oats provide the base for the topping. They add a chewy texture and a nutty flavor.
- Flour: All-purpose flour helps bind the topping together and gives it a crumbly texture.
- Butter: Butter is essential for creating a rich, buttery flavor and a crispy texture. For a vegan option, you can use coconut oil or a plant-based butter substitute.
- Sugar: Brown sugar is commonly used in crisp toppings for its molasses flavor, which pairs well with the fruits. You can also use white sugar or a combination of both.
- Spices: Cinnamon and nutmeg are classic spices that enhance the flavor of the fruits and add warmth to the dessert.
Cinnamon and Nutmeg Flavoring
Cinnamon and nutmeg are the quintessential spices for apple-pear crisp. They add a warm, aromatic flavor that complements the natural sweetness of the fruits. Cinnamon is known for its sweet and woody flavor, while nutmeg adds a slightly nutty and spicy note. Together, they create a harmonious blend that elevates the overall taste of the dessert.
Step-by-Step Instructions to Make the Perfect Apple-Pear Crisp

Preparing the Fruits
- Peel and Core: Start by peeling and coring the apples and pears. While you can leave the skin on for added texture and nutrients, peeling the fruits will give your crisp a more uniform texture.
- Slice Evenly: Slice the fruits into even pieces, about 1/4-inch thick. This ensures that they cook evenly and create a cohesive filling.
- Toss with Sugar and Spices: In a large bowl, toss the sliced fruits with sugar, cinnamon, nutmeg, and a pinch of salt. The sugar will help draw out the juices from the fruits, creating a syrupy filling.
Making the Crumb Topping
- Combine Dry Ingredients: In a separate bowl, combine the rolled oats, flour, brown sugar, and a pinch of salt. Mix well to ensure that the ingredients are evenly distributed.
- Cut in the Butter: Add cold, cubed butter to the dry ingredients. Use a pastry cutter or your fingers to cut the butter into the mixture until it resembles coarse crumbs. The butter should be evenly distributed, but there should still be some larger chunks for added texture.
- Add Nuts (Optional): If you want to add nuts to your topping, such as chopped walnuts or pecans, mix them in at this stage. Nuts add a delightful crunch and extra flavor to the crisp.
Layering and Baking
- Preheat the Oven: Preheat your oven to 375°F (190°C). This ensures that the crisp bakes evenly and the topping becomes golden brown.
- Layer the Fruits: Spread the prepared fruit mixture evenly in a baking dish. A 9×13-inch dish works well for a standard recipe, but you can use a smaller dish for a thicker crisp.
- Add the Topping: Sprinkle the crumb topping evenly over the fruit layer. Make sure to cover the entire surface for a consistent texture.
- Bake to Perfection: Bake the crisp in the preheated oven for 35-45 minutes, or until the topping is golden brown and the fruit filling is bubbling. The exact baking time may vary depending on your oven and the size of your baking dish, so keep an eye on it as it bakes.
Serving Suggestions
- Let it Cool: Allow the crisp to cool for about 10-15 minutes before serving. This gives the filling a chance to set and makes it easier to serve.
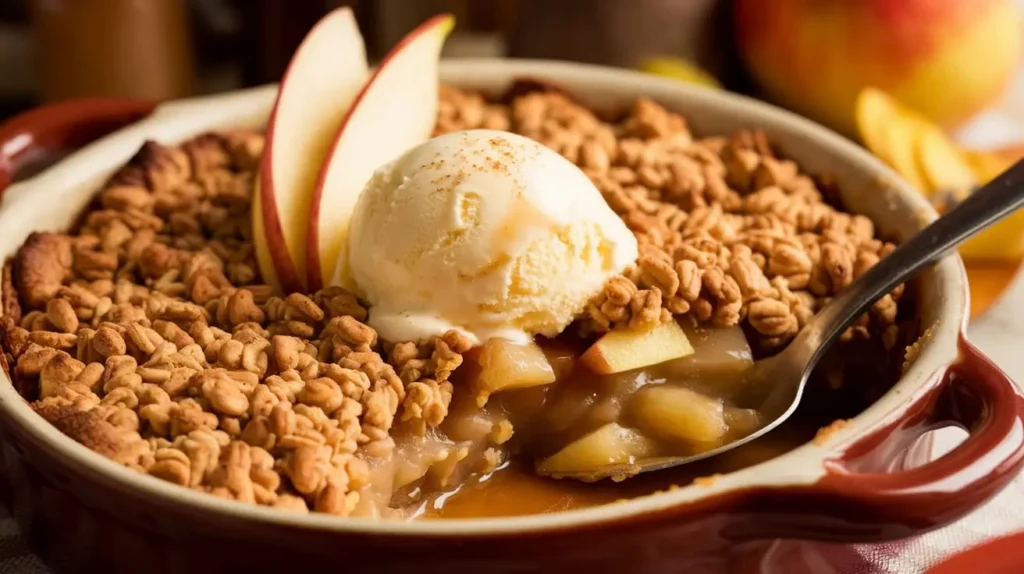
- Add a Scoop of Ice Cream: For an extra indulgent treat, serve the crisp with a scoop of vanilla ice cream. The cold, creamy ice cream pairs perfectly with the warm, fruity crisp.
- Whipped Cream or Yogurt: If you prefer something lighter, you can serve the crisp with a dollop of whipped cream or a spoonful of Greek yogurt.
Tips and Tricks to Elevate Your Apple-Pear Crisp Experience

Adding Nuts or Spices
- Nuts: Adding nuts to your crisp topping can take it to the next level. Walnuts, pecans, and almonds are all great options. They add a delightful crunch and a nutty flavor that complements the fruits.
- Spices: While cinnamon and nutmeg are the classic spices for apple-pear crisp, you can experiment with other spices like cardamom, ginger, or allspice. These spices add depth and complexity to the flavor profile.
Serving Suggestions
- Ice Cream: As mentioned earlier, serving the crisp with vanilla ice cream is a classic choice. However, you can also try other flavors like caramel, cinnamon, or even a fruity sorbet.
- Whipped Cream: For a lighter option, whipped cream is a great choice. You can also flavor the whipped cream with a bit of vanilla extract or a splash of liqueur for an extra touch of elegance.
- Yogurt: If you’re looking for a healthier option, Greek yogurt is a great alternative to ice cream or whipped cream. It adds a tangy contrast to the sweet crisp.
Variations with Other Fruits
- Berries: Adding berries like blueberries, raspberries, or blackberries to the fruit mixture can add a burst of color and flavor. Berries also add a bit of tartness, which balances out the sweetness of the apples and pears.
- Stone Fruits: Peaches, plums, and cherries are all great additions to an apple-pear crisp. They add a different texture and flavor profile, making the dessert more complex and interesting.
- Tropical Fruits: For a unique twist, you can add tropical fruits like mango, pineapple, or kiwi. These fruits add a refreshing, exotic flavor that pairs well with the warm spices.
Packing in Flavors: How to Customize Your Apple-Pear Crisp Recipe

Vegan Apple-Pear Crisp Options
If you’re following a vegan diet, you can easily adapt the apple-pear crisp recipe to suit your needs. Here are some simple substitutions:
- Butter: Replace the butter with a plant-based alternative like coconut oil or vegan margarine. These options will give you the same rich, buttery flavor without any animal products.
- Sugar: Most sugars are vegan, but if you want to be extra cautious, look for organic or unrefined sugars that are certified vegan.
- Toppings: Instead of traditional whipped cream or ice cream, you can use coconut whipped cream or a dairy-free ice cream alternative.
Gluten-Free Alternatives for Topping
For those with gluten sensitivities or celiac disease, you can make a gluten-free version of the apple-pear crisp by using gluten-free oats and flour. Here are some tips:
- Oats: Make sure to use certified gluten-free oats, as regular oats can be cross-contaminated with gluten during processing.
- Flour: There are many gluten-free flour options available, such as almond flour, oat flour, or a gluten-free all-purpose flour blend. These flours will give you a similar texture to traditional flour without the gluten.
Adding Caramel or Chocolate Flavors
If you want to take your apple-pear crisp to the next level, consider adding caramel or chocolate flavors:
- Caramel: Drizzle caramel sauce over the fruit mixture before adding the topping. You can also mix caramel bits into the topping for a gooey, caramelized texture.
- Chocolate: Add chocolate chips or chunks to the fruit mixture for a decadent twist. Dark chocolate, milk chocolate, or even white chocolate can all work well, depending on your preference.
Conclusion: Indulge in the Warmth of Homemade Apple-Pear Crisp Today!
Apple-pear crisp is a dessert that embodies the essence of comfort and simplicity. With its warm, fruity filling and crispy, buttery topping, it’s a dish that brings joy to any occasion. Whether you’re making it for a family dinner, a holiday feast, or just a cozy night in, this dessert is sure to impress. By following the tips and tricks outlined in this article, you can create a crisp that is perfectly tailored to your taste.
So why wait? Gather your ingredients, preheat your oven, and indulge in the warmth of homemade apple-pear crisp today!
Frequently Asked Questions (FAQs)
- Can I make apple-pear crisp ahead of time?
- Yes, you can prepare the crisp ahead of time and store it in the refrigerator before baking. When you’re ready to serve, simply bake it as directed. You can also bake it ahead of time and reheat it in the oven before serving.
- How do I store leftover apple-pear crisp?
- Store leftover crisp in an airtight container in the refrigerator for up to 3-4 days. You can reheat it in the oven or microwave before serving.
- Can I freeze apple-pear crisp?
- Yes, you can freeze the crisp before or after baking. If freezing before baking, assemble the crisp in a freezer-safe dish, cover tightly with plastic wrap and foil, and freeze for up to 3 months. When ready to bake, you can bake it directly from the freezer, adding a few extra minutes to the baking time. If freezing after baking, let the crisp cool completely, then cover and freeze. Reheat in the oven before serving.
- What are the best apples for baking in a crisp?
- Some of the best apples for baking include Granny Smith, Honeycrisp, Braeburn, and Fuji. These apples hold their shape well and provide a good balance of sweet and tart flavors.
- Can I use other fruits in the crisp?
- Absolutely! You can add berries, stone fruits, or even tropical fruits to the crisp for a unique twist. Just make sure to adjust the sugar and spices accordingly.
- How can I make a vegan apple-pear crisp?
- To make a vegan crisp, replace the butter with a plant-based alternative like coconut oil or vegan margarine. Use certified vegan sugar and serve with dairy-free toppings like coconut whipped cream or vegan ice cream.
- What can I use instead of oats in the topping?
- If you don’t have oats or prefer not to use them, you can use a mixture of flour and nuts for the topping. Almond flour or coconut flour can also be used as a gluten-free alternative.
- Can I make a gluten-free apple-pear crisp?
- Yes, you can make a gluten-free crisp by using certified gluten-free oats and a gluten-free flour blend. Make sure all other ingredients are also gluten-free.
- How do I prevent the topping from getting soggy?
- To prevent the topping from getting soggy, make sure to bake the crisp until the topping is golden brown and the fruit filling is bubbling. You can also let the crisp cool for a few minutes before serving to allow the topping to set.
- What are some creative ways to serve apple-pear crisp?
- In addition to serving with ice cream or whipped cream, you can try serving the crisp with a drizzle of caramel or chocolate sauce, a sprinkle of powdered sugar, or a side of fresh berries. You can also serve it in individual ramekins for a more elegant presentation.