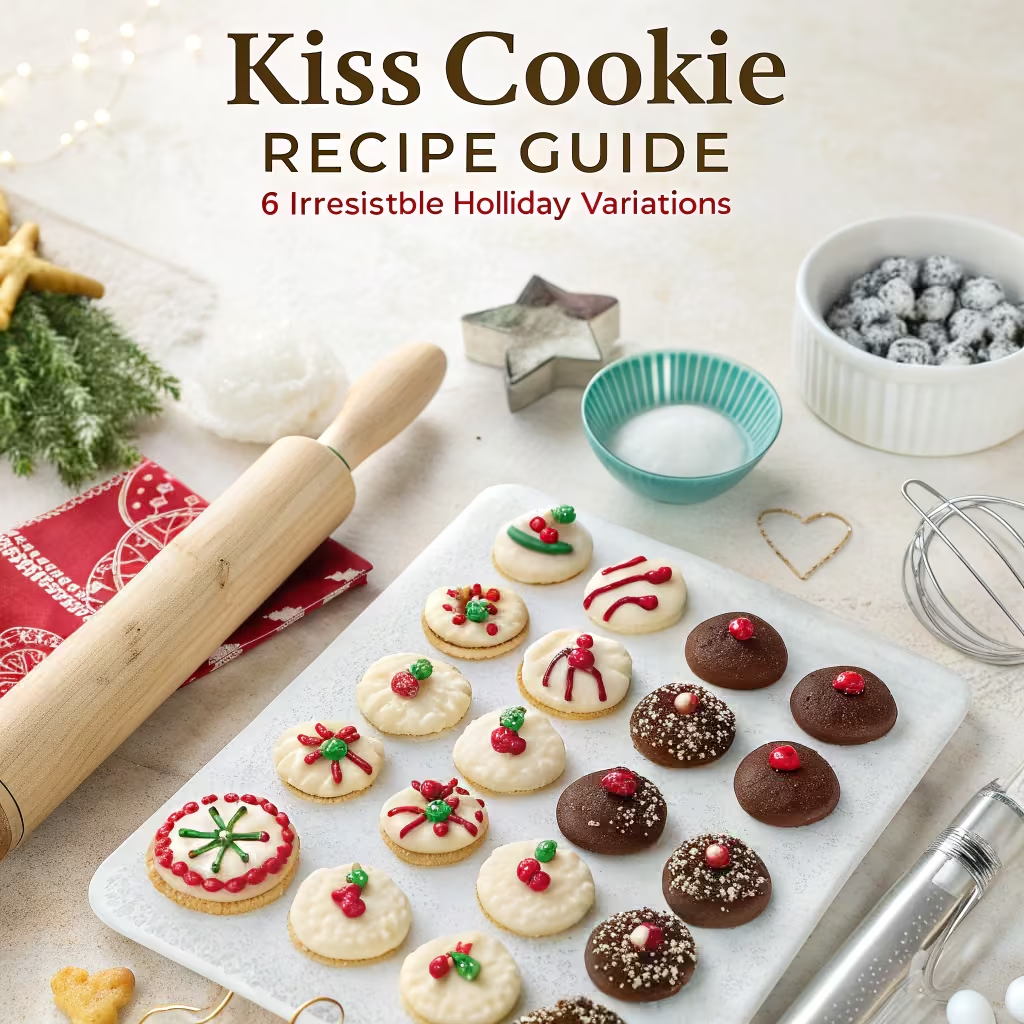
Discover the ultimate Kiss Cookie Recipe collection! Master 6 classic & creative variations with our chef’s tips, nutritional facts, and FAQ. Bake the perfect, chewy holiday treat every time.
Why the Kiss Cookie Recipe is a Holiday Icon
There is perhaps no treat more emblematic of holiday baking cheer than the beloved Kiss Cookie Recipe. This iconic dessert, characterized by a soft, pillowy cookie cradling a perfect Hershey’s Kiss, is more than just a confection; it’s a piece of edible nostalgia. The magic of a great Kiss Cookie Recipe lies in its delightful contrast of textures—a chewy, tender base giving way to a smooth, melting chocolate center. It’s a simple concept executed to perfection, making it a guaranteed crowd-pleaser on any cookie tray.
This comprehensive guide is your definitive resource for mastering this classic. We will explore the history, delve into six distinct and show-stopping variations, provide professional chef secrets for flawless execution, and answer every possible question. Whether you’re a baking novice or a seasoned pro, this Kiss Cookie Recipe masterclass will equip you to create the most memorable holiday cookies of your life.
The History and Allure of the Classic Kiss Cookie Recipe
To truly appreciate the Kiss Cookie Recipe, it helps to understand its origins. The most famous version, the Peanut Butter Blossom, is widely credited to a home baker named Freda Smith. In 1957, she entered the recipe into the Pillsbury Bake-Off contest under the name “Black-Eyed Susans.” While it didn’t win the grand prize, its popularity exploded after Pillsbury featured it in their annual cookbooklet. The combination of creamy peanut butter and milk chocolate was an instant, undeniable hit.
The Kiss Cookie Recipe has endured for decades because of its perfect formula:
- Simplicity: The dough is straightforward, often using creaming method basics.
- Visual Appeal: The chocolate kiss center is festive, fun, and instantly recognizable.
- Customizability: The base recipe is a canvas for creativity, allowing for endless flavor infusions.
- Family-Friendly Activity: The process of rolling dough balls and pressing in the kisses is a joyful, inclusive activity for bakers of all ages.
This guide honors that tradition while expanding your repertoire with exciting new twists on the classic Kiss Cookie Recipe.
Mastering the Fundamentals: The Anatomy of a Perfect Kiss Cookie
Before we dive into the specific recipes, let’s break down the core components that every successful Kiss Cookie Recipe shares. Understanding the “why” behind the steps is the key to baking mastery.
The Dough: Achieving the Perfect Chewy Texture
The foundation of any great Kiss Cookie Recipe is a soft, chewy dough that holds its shape just enough to support the chocolate kiss. The chewy texture primarily comes from two factors: the fat-to-flour ratio and the type of sugar used.
- Butter & Peanut Butter: Fat is crucial for tenderness. Properly creamed butter (and peanut butter, where used) incorporates air, leading to a lighter crumb. Using a combination of granulated and brown sugar is the other secret. Brown sugar, with its molasses content, attracts and retains moisture, resulting in a denser, chewier cookie.
- Flour: All-purpose flour provides the right structure. It’s essential to measure it correctly—using the “spoon and level” method prevents accidentally adding too much flour, which is a common cause of dry, crumbly cookies.
- Leavening: Most Kiss Cookie Recipes use baking soda. It helps the cookies spread slightly and rise, creating the perfect platform for the kiss.
The Star Ingredient: Unwrapping the Hershey’s Kiss
The chocolate kiss is not just a garnish; it’s an integral part of the Kiss Cookie Recipe experience. While the classic milk chocolate kiss is perfection, don’t be afraid to experiment:
- Hugs: The swirled white and milk chocolate adds a beautiful visual element.
- Dark Chocolate: For a richer, less sweet option.
- Candy Cane Kisses: These seasonal favorites bring a delightful minty crunch.
- Caramel-Filled Kisses: For an extra gooey, decadent center.
The key is to unwrap all your kisses before you start baking. Once the cookies come out of the oven, you need to work quickly, and having them ready is a critical step.
The Critical Technique: Pressing the Kiss
This is the moment of truth in any Kiss Cookie Recipe. The cookies must be hot from the oven when you press the kiss into the center. The residual heat slightly melts the base of the chocolate, “gluing” it securely to the cookie. If you wait too long, the cookie sets and the kiss will simply fall off. Press firmly but gently—you want to embed the kiss about halfway into the cookie, causing a charming crackle to form around the edges.
The Ultimate Kiss Cookie Recipe Collection: 6 Festive Variations

Now, let’s explore our curated collection of Kiss Cookie Recipes. Each one includes detailed instructions, precise baking times, and a nutritional breakdown to help you make informed choices.
1. The Timeless Classic: Peanut Butter Blossom Kiss Cookie Recipe

This is the Kiss Cookie Recipe that started it all. The salty-sweet harmony of peanut butter and chocolate is a combination that simply cannot be beaten.
Ingredients:
- 1 3/4 cups all-purpose flour (spooned and leveled)
- 1 teaspoon baking soda
- 1/2 teaspoon fine sea salt
- 1/2 cup unsalted butter, softened to room temperature
- 1/2 cup creamy peanut butter (not natural style)
- 1/2 cup granulated sugar, plus extra for rolling
- 1/2 cup packed light brown sugar
- 1 large egg, room temperature
- 1 teaspoon pure vanilla extract
- 48 Hershey’s Milk Chocolate Kisses, unwrapped
Instructions:
- Prep: Preheat oven to 375°F (190°C). Line two large baking sheets with parchment paper.
- Dry Whisk: In a medium bowl, whisk together the flour, baking soda, and salt. This ensures even distribution of the leavening.
- Creaming Method: In the bowl of a stand mixer fitted with the paddle attachment (or with a hand mixer), cream the softened butter, peanut butter, granulated sugar, and brown sugar on medium-high speed for 2-3 minutes, until light, pale, and fluffy. Scrape down the bowl.
- Wet Ingredients: Beat in the egg and vanilla extract until fully incorporated.
- Combine: Gradually add the dry ingredients to the wet ingredients, mixing on low speed only until the flour disappears. Do not overmix.
- Shape: Roll tablespoons of dough into smooth 1-inch balls. Roll each ball in a small bowl of granulated sugar to coat lightly.
- Bake: Place the dough balls 2 inches apart on the prepared baking sheets. Bake for 8-10 minutes. The cookies will look puffy and the edges will be lightly set. They will not look fully done.
- The Kiss: Immediately upon removal from the oven, gently but firmly press a Hershey’s Kiss into the center of each cookie. The cookie will crack around the edges.
- Cool: Allow the cookies to cool on the baking sheet for 5 minutes before transferring them to a wire rack to cool completely. The chocolate will set as they cool.
Nutritional Facts (Per Cookie):
- Calories: ~125 kcal
- Total Fat: 6g
- Saturated Fat: 3g
- Cholesterol: 15mg
- Sodium: 85mg
- Total Carbohydrates: 16g
- Dietary Fiber: 0.5g
- Sugars: 10g
- Protein: 2g
2. The Decadent Delight: Double Chocolate Kiss Cookie Recipe

For the true chocoholic, this Kiss Cookie Recipe delivers an intense, fudgy experience. The cocoa powder in the dough makes the milk chocolate kiss on top even more luxurious.
Ingredients:
- 1/2 cup unsalted butter, softened
- 1/2 cup granulated sugar
- 1/2 cup packed light brown sugar
- 1 large egg, room temperature
- 1 teaspoon pure vanilla extract
- 1 1/4 cups all-purpose flour
- 1/2 cup high-quality unsweetened cocoa powder (Dutch-processed preferred)
- 1/2 teaspoon baking soda
- 1/4 teaspoon salt
- 36-40 Hershey’s Milk Chocolate Kisses, unwrapped
Instructions:
- Prep: Preheat oven to 350°F (175°C). Line baking sheets with parchment paper.
- Cream: In a large bowl, cream the butter with both sugars until light and fluffy, about 2 minutes.
- Combine Wet: Add the egg and vanilla, beating until smooth.
- Dry Sift: In a separate bowl, sift together the flour, cocoa powder, baking soda, and salt. Sifting is crucial here to prevent lumps of cocoa.
- Mix Dough: Gradually add the dry ingredients to the wet mixture, mixing on low speed until a soft, cohesive dough forms. It may be slightly crumbly but should hold together when pressed.
- Shape: Roll the dough into 1-inch balls. The dough is richer and denser, so you may get slightly fewer cookies.
- Bake: Place on prepared sheets and bake for 9-11 minutes. The tops will look crackled and the centers will be soft.
- The Kiss: Press a kiss into the center of each hot cookie. Allow to cool on the sheet for 5-10 minutes before moving to a rack, as these are more delicate when warm.
Nutritional Facts (Per Cookie):
- Calories: ~115 kcal
- Total Fat: 5g
- Saturated Fat: 3g
- Cholesterol: 15mg
- Sodium: 55mg
- Total Carbohydrates: 17g
- Dietary Fiber: 1g
- Sugars: 11g
- Protein: 2g
3. The Spiced Winter Warmth: Gingerbread Kiss Cookie Recipe

This Kiss Cookie Recipe infuses the classic with the warm, comforting spices of the season. The deep, robust flavor of molasses and ginger creates a sophisticated cookie that pairs beautifully with the sweet chocolate.
Ingredients:
- 2 1/4 cups all-purpose flour
- 2 teaspoons ground ginger
- 1 teaspoon ground cinnamon
- 1/2 teaspoon ground nutmeg
- 1/4 teaspoon ground cloves
- 1 teaspoon baking soda
- 1/4 teaspoon salt
- 3/4 cup unsalted butter, softened
- 1/2 cup packed dark brown sugar
- 1 large egg, room temperature
- 1/3 cup unsulphured molasses (not blackstrap)
- 36-40 Hershey’s Milk Chocolate Kisses, unwrapped
Instructions:
- Prep: Preheat oven to 350°F (175°C).
- Whisk Dry: In a medium bowl, thoroughly whisk the flour, ginger, cinnamon, nutmeg, cloves, baking soda, and salt.
- Cream: In a large bowl, cream the butter and dark brown sugar until fluffy. Beat in the egg and molasses until the mixture is smooth and well-combined.
- Combine: Gradually stir the dry ingredients into the wet molasses mixture. The dough will be soft but manageable.
- Chill (Optional): For easier handling, cover and chill the dough for 30 minutes.
- Shape: Roll the dough into 1-inch balls.
- Bake: Place on ungreased or parchment-lined baking sheets. Bake for 8-10 minutes. The cookies will be puffy and the tops may crack.
- The Kiss: Immediately press a chocolate kiss into the center of each cookie. Let them cool on the baking sheet for several minutes before transferring, as they are very soft initially.
Nutritional Facts (Per Cookie):
- Calories: ~120 kcal
- Total Fat: 5g
- Saturated Fat: 3g
- Cholesterol: 15mg
- Sodium: 60mg
- Total Carbohydrates: 18g
- Dietary Fiber: 0.5g
- Sugars: 10g
- Protein: 2g
4. The Festive Crunch: Candy Cane Kiss Cookie Recipe

This visually stunning Kiss Cookie Recipe combines a soft, buttery peppermint cookie with a festive red crust and a mint-chocolate kiss. It’s a celebration in every bite.
Ingredients:
- 1 cup unsalted butter, softened
- 1 cup granulated sugar
- 1 large egg, room temperature
- 1 teaspoon peppermint extract
- 1/2 teaspoon pure vanilla extract
- 2 1/2 cups all-purpose flour
- 1/2 teaspoon baking soda
- 1/4 teaspoon salt
- 1/2 cup red sanding sugar or crushed red sprinkles
- 36-40 Hershey’s Candy Cane Kisses, unwrapped
Instructions:
- Prep: Preheat oven to 350°F (175°C).
- Cream: Cream the butter and granulated sugar until light and fluffy. Beat in the egg, peppermint extract, and vanilla extract.
- Combine Dry: In a separate bowl, combine the flour, baking soda, and salt.
- Mix Dough: Gradually add the dry ingredients to the wet ingredients, mixing until a soft dough forms.
- Shape & Decorate: Roll dough into 1-inch balls. Dip the top of each ball into the red sanding sugar, coating the top half.
- Bake: Place the balls, sugar-side up, on ungreased baking sheets. Bake for 9-11 minutes, until the edges are just set. The centers should not brown.
- The Kiss: As soon as the cookies are out of the oven, press a Candy Cane Kiss into the center. The striped kiss will soften quickly. Cool completely.
Nutritional Facts (Per Cookie):
- Calories: ~130 kcal
- Total Fat: 6g
- Saturated Fat: 4g
- Cholesterol: 20mg
- Sodium: 40mg
- Total Carbohydrates: 18g
- Dietary Fiber: 0g
- Sugars: 11g
- Protein: 1g
5. The Tropical Escape: Coconut Blossom Kiss Cookie Recipe

This Kiss Cookie Recipe offers a delightful tropical twist. The chewy, coconut-infused cookie provides a perfect, snow-like backdrop for the milk chocolate kiss.
Ingredients:
- 1/2 cup unsalted butter, softened
- 1/2 cup granulated sugar
- 1/2 cup packed light brown sugar
- 1 large egg, room temperature
- 1 teaspoon pure vanilla extract
- 1 3/4 cups all-purpose flour
- 1/2 teaspoon baking soda
- 1/4 teaspoon salt
- 1 1/2 cups sweetened shredded coconut, divided
- 36-40 Hershey’s Milk Chocolate Kisses, unwrapped
Instructions:
- Prep: Preheat oven to 350°F (175°C). Line baking sheets with parchment.
- Cream: Cream the butter and both sugars until fluffy. Beat in the egg and vanilla.
- Combine Dry: In a bowl, whisk the flour, baking soda, and salt.
- Mix Dough & Coconut: Gradually add the dry ingredients to the butter mixture. Stir in 1 cup of the shredded coconut by hand.
- Shape & Coat: Roll dough into 1-inch balls. Roll each ball in the remaining 1/2 cup of coconut to coat the outside.
- Bake: Place on prepared sheets and bake for 9-11 minutes, until the coconut is lightly toasted.
- The Kiss: Immediately press a kiss into the center of each warm cookie. Cool completely on a wire rack.
Nutritional Facts (Per Cookie):
- Calories: ~135 kcal
- Total Fat: 7g
- Saturated Fat: 5g
- Cholesterol: 15mg
- Sodium: 60mg
- Total Carbohydrates: 17g
- Dietary Fiber: 1g
- Sugars: 11g
- Protein: 2g
6. The Elegant Snowball: Melt-in-Your-Mouth Kiss Cookie Recipe

Inspired by Russian tea cakes, this Kiss Cookie Recipe is delicate, buttery, and rolled in a blizzard of powdered sugar. It’s the most elegant and subtle variation.
Ingredients:
- 1 cup unsalted butter, softened
- 1/2 cup powdered sugar, plus 1 cup for coating
- 1 teaspoon pure vanilla extract
- 2 1/4 cups all-purpose flour
- 1/4 teaspoon salt
- 36-40 Hershey’s Milk Chocolate Kisses, unwrapped
Instructions:
- Prep: Preheat oven to 350°F (175°C).
- Cream: Cream the butter, 1/2 cup powdered sugar, and vanilla until smooth and creamy.
- Combine: Gradually mix in the flour and salt on low speed until a soft dough forms.
- Shape: Shape the dough into 1-inch balls.
- Bake: Place on ungreased baking sheets and bake for 12-14 minutes. The bottoms should be lightly golden, but the tops should remain pale.
- First Sugar Coat: Let cookies cool just until you can handle them. While still warm, roll them generously in the remaining 1 cup of powdered sugar.
- The Kiss & Second Coat: Gently press a kiss into the center. Once completely cool, roll them in powdered sugar a second time for a thick, snowy appearance.
Nutritional Facts (Per Cookie):
- Calories: ~120 kcal
- Total Fat: 7g
- Saturated Fat: 4g
- Cholesterol: 15mg
- Sodium: 15mg
- Total Carbohydrates: 14g
- Dietary Fiber: 0g
- Sugars: 7g
- Protein: 1g
LEARN MORE :
The best Guide to 4 No-Bake Dessert Lasagna
How to Make a Stunning Turkey Charcuterie Board
Dulce de Leche Cookie Bars
Pro Chef Secrets for the Perfect Kiss Cookie Recipe
Elevate your baking from good to extraordinary with these insider tips from professional kitchens.
- Ingredient Temperature is Non-Negotiable: Using room-temperature butter, eggs, and dairy (like peanut butter that needs stirring) is the single most important factor. Room-temperature ingredients emulsify better, creating a smoother, more aerated dough that bakes evenly. *To quickly bring an egg to room temp, place it in a bowl of warm water for 5-10 minutes.*
- Master the Creaming Method: When a recipe says “cream until light and fluffy,” it means it. This step is not just about mixing; it’s about beating tiny air bubbles into the fat. These air bubbles expand in the oven, giving the cookie its lift and texture. This should take a full 2-3 minutes with a mixer on medium-high speed.
- Weigh Your Flour: The most accurate way to measure flour is by weight. If you must use cups, use the “spoon and level” method: spoon the flour into your measuring cup and level it off with the back of a knife. Never scoop the cup directly into the flour bag, as this packs it down and can add up to 20% more flour, leading to dry cookies.
- The Chill Factor: If your dough feels overly soft or sticky, a short 15-30 minute chill in the refrigerator will make it much easier to handle and roll. It also prevents the cookies from spreading too much in the oven.
- Know Your Oven: Oven thermostats are notoriously inaccurate. Use an independent oven thermometer to know your true baking temperature. Rotate your baking sheets halfway through the baking time for even browning, especially if your oven has hot spots.
- The Power of Parchment Paper: Lining your baking sheets with parchment paper is a chef’s secret for perfect cookies. It prevents sticking without added grease, promotes even browning, and makes cleanup a breeze.
- Don’t Overbake! Kiss cookies continue to cook on the hot baking sheet after they are removed from the oven. They are done when the edges are just set and the centers still look slightly soft and underdone. They will firm up perfectly as they cool.
Kiss Cookie Recipe FAQ: Your Questions Answered
Q1: Can I make kiss cookie dough ahead of time?
A: Absolutely! Most kiss cookie doughs freeze beautifully. Prepare the dough, roll into balls, and freeze them in a single layer on a baking sheet. Once solid, transfer to a freezer bag. You can bake them directly from frozen, adding 1-2 minutes to the baking time.
Q2: Why did my kisses melt or lose their shape?
A: This usually happens for one of two reasons: 1) The cookies were too hot when you pressed the kiss in. While they need to be warm, if they are scorching, the chocolate will melt. Let them sit for 30-45 seconds first. 2) The brand of chocolate kiss matters. Hershey’s Kisses are formulated to hold their shape reasonably well. Off-brand chocolates may not have the same stability.
Q3: My cookies spread too much. What went wrong?
A: The most common culprits are: butter that was too soft or melted, an under-measured flour, or an under-heated oven. Ensure your butter is cool to the touch and your oven is fully preheated. Chilling the dough can also help combat spread.
Q4: My cookies are too cakey and puffy. How can I make them chewier?
A: A cakey texture often results from too much flour or overmixing the dough after the flour is added. Be precise with your flour measurement and mix only until the flour streaks disappear.
Q5: Can I use natural peanut butter?
A: It’s not recommended for classic Peanut Butter Blossoms. Natural peanut butter (the kind that separates) has a different oil content and texture, which can throw off the dough’s consistency, often making it greasy and preventing it from holding its shape.
Q6: How do I store kiss cookies to keep them fresh?
A: Store them in a single layer in an airtight container at room temperature for up to one week. Placing a piece of bread in the container can help keep the cookies soft.
Q7: Can I use other chocolates besides Hershey’s Kisses?
A: Yes! Rolo candies, Reese’s Peanut Butter Cups (mini), or even a square of a chocolate bar can work. Just be mindful of the size and adjust baking time if necessary.
Q8: Why do you roll the Peanut Butter Blossoms in sugar before baking?
A: This step serves two purposes: it gives the cookie a delightful, subtle crunch and a sparkly, professional appearance.
Q9: My cookie is stuck to the baking sheet. How can I prevent this?
A: Parchment paper or a silicone baking mat is your best insurance against sticking. Never bake these cookies on an ungreased, unlined aluminum sheet.
Q10: Are kiss cookies freezer-friendly after baking?
A: Yes, they freeze very well. Place cooled cookies in a single layer in a freezer-safe container, separated by parchment paper. They will keep for up to 3 months. Thaw at room temperature.
Conclusion: Your Journey to Kiss Cookie Recipe Mastery
The journey through these six spectacular Kiss Cookie Recipes demonstrates the incredible versatility and enduring appeal of this holiday classic. From the timeless peanut butter to the sophisticated gingerbread and the festive candy cane, each variation offers a unique way to celebrate the season through the art of baking.
Mastering the perfect Kiss Cookie Recipe is a rewarding endeavor. It combines the precision of baking science with the creative joy of crafting something beautiful and delicious. By understanding the fundamentals, applying the pro chef tips, and trusting the process, you are now equipped to not only replicate these recipes but to make them your own. So, gather your ingredients, preheat your oven, and share the timeless gift of a homemade kiss cookie. The smiles they bring are the sweetest reward of all.
Happy Baking and Happy Holidays!